Node.js + Nginx: Production Reverse Proxy & Load Balancing Guide 2026
Running Node.js directly in production without a reverse proxy is one of the most common mistakes teams make when scaling their applications. While Node.js handles concurrent connections efficiently thanks to its event loop, it was never designed to manage SSL termination, serve static files at scale, or distribute traffic across multiple instances on its own.
In 2026, Nginx remains the gold standard for fronting Node.js applications in production. Whether you are deploying a single-server API or orchestrating a fleet of microservices behind a load balancer, Nginx provides the performance, reliability, and security features your application needs to handle real-world traffic. This guide covers everything from basic reverse proxy configuration to advanced load balancing strategies, SSL termination, and health check patterns.
Why Use Nginx as a Reverse Proxy for Node.js
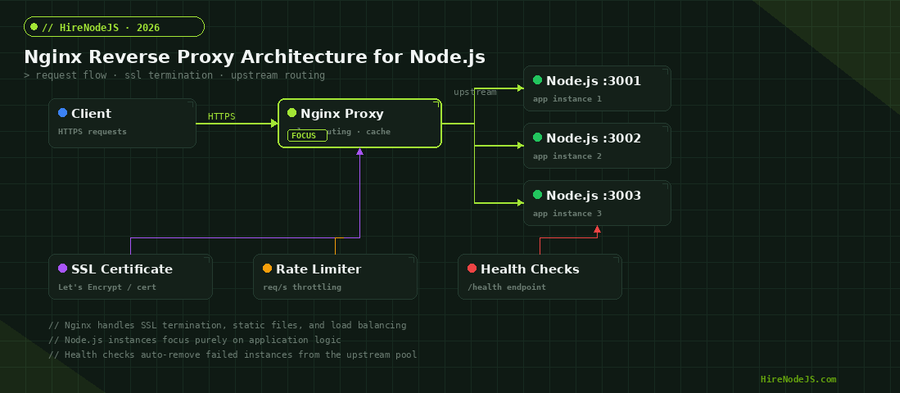
A reverse proxy sits between the client and your application servers, forwarding requests on behalf of the client. Nginx excels in this role because of its event-driven, non-blocking architecture — a single Nginx worker process can handle thousands of concurrent connections with minimal memory overhead.
Offloading Work from Node.js
Node.js is single-threaded by design. Every CPU cycle spent on SSL handshakes, gzip compression, or serving static assets is a cycle not spent processing business logic. By offloading these tasks to Nginx, your Node.js processes can focus exclusively on what they do best: running your application code.
Security at the Edge
Nginx acts as a shield for your Node.js instances. It can enforce rate limiting, filter malicious headers, block known attack patterns, and restrict access by IP — all before a request ever reaches your application. For teams building backend APIs, this separation of concerns is critical for maintaining a strong security posture.
Additionally, Nginx prevents direct exposure of your Node.js ports to the internet. Clients connect to ports 80 and 443 on Nginx, while your Node.js instances listen on internal ports like 3001, 3002, and 3003 — invisible to the outside world.
Setting Up a Basic Nginx Reverse Proxy
The foundation of any Nginx-Node.js deployment starts with a simple reverse proxy configuration. This setup forwards all incoming HTTP requests to a single Node.js instance running on localhost.
The Upstream Block
Nginx uses the upstream directive to define a group of backend servers. Even if you start with a single Node.js instance, defining an upstream block from the beginning makes it trivial to add more instances later without changing the rest of your configuration.
# /etc/nginx/conf.d/app.conf

upstream nodejs_backend {
    least_conn;
    server 127.0.0.1:3001 max_fails=3 fail_timeout=30s;
    server 127.0.0.1:3002 max_fails=3 fail_timeout=30s;
    server 127.0.0.1:3003 max_fails=3 fail_timeout=30s;
    keepalive 64;
}

server {
    listen 80;
    server_name api.example.com;

    location / {
        proxy_pass http://nodejs_backend;
        proxy_http_version 1.1;
        proxy_set_header Upgrade $http_upgrade;
        proxy_set_header Connection 'upgrade';
        proxy_set_header Host $host;
        proxy_set_header X-Real-IP $remote_addr;
        proxy_set_header X-Forwarded-For $proxy_add_x_forwarded_for;
        proxy_set_header X-Forwarded-Proto $scheme;
        proxy_cache_bypass $http_upgrade;

        # Timeouts
        proxy_connect_timeout 60s;
        proxy_send_timeout 60s;
        proxy_read_timeout 60s;
    }

    # Serve static files directly from Nginx
    location /static/ {
        root /var/www/app;
        expires 30d;
        add_header Cache-Control "public, immutable";
    }
}
Critical Headers for Node.js
The proxy_set_header directives are not optional. Without X-Real-IP and X-Forwarded-For, your Node.js application will see all requests as coming from 127.0.0.1 — making rate limiting, geolocation, and audit logging completely useless. The Upgrade and Connection headers are essential for WebSocket support.
Choosing the Right Load Balancing Algorithm
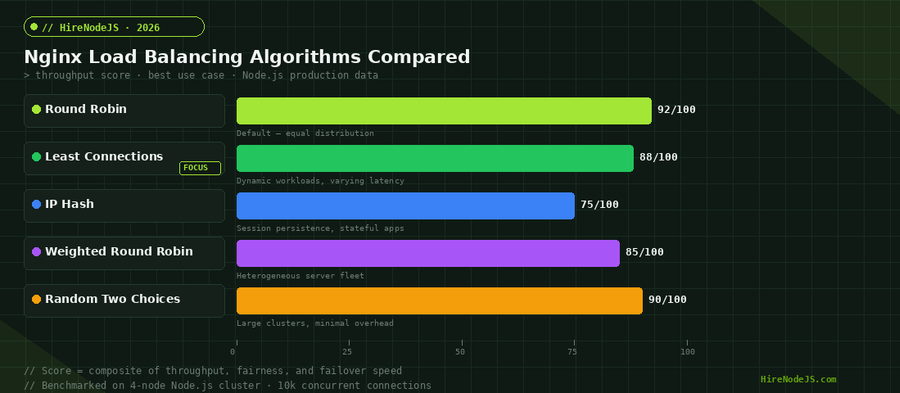
Nginx supports several load balancing algorithms out of the box, and the right choice depends on your application characteristics. The default round-robin works surprisingly well for most Node.js APIs, but understanding the alternatives lets you optimize for specific traffic patterns.
Round Robin — The Sensible Default
Round robin distributes requests sequentially across all upstream servers. With three Node.js instances, requests go to server 1, then server 2, then server 3, then back to server 1. This works well when all servers have similar hardware specifications and request processing times are relatively uniform.
Least Connections — For Variable Workloads
The least_conn algorithm sends each new request to the server with the fewest active connections. This is the recommended choice for Node.js APIs where request processing times vary significantly — for example, endpoints that sometimes hit a cache and sometimes query a database. It naturally adapts to real-time server load without manual intervention.
IP Hash — For Stateful Applications
IP hash calculates a hash from the client IP address and consistently routes that client to the same backend server. This provides session persistence without external session stores like Redis. However, it comes with a significant downside: if one server goes down, all sessions pinned to it are lost, and the hash redistribution can be uneven with NAT or proxy chains.
Hire Pre-Vetted Node.js Developers
Skip the months-long search. Our exclusive talent network has senior Node.js experts ready to join your team in 48 hours.
SSL Termination and HTTPS Configuration
SSL termination at the Nginx layer is one of the biggest performance wins you can achieve. TLS handshakes are computationally expensive, and offloading this work to Nginx — which is optimized for it — frees your Node.js processes to handle application logic.
Let's Encrypt with Certbot
In 2026, there is no excuse for not running HTTPS. Let's Encrypt provides free, automatically renewing TLS certificates, and Certbot handles the entire lifecycle. Combined with Nginx, you get production-grade encryption with zero ongoing cost.
SSL Session Caching and OCSP Stapling
For high-traffic Node.js applications, SSL session caching dramatically reduces the overhead of repeated TLS handshakes from the same clients. OCSP stapling eliminates the need for clients to contact the certificate authority separately, shaving 100-300 milliseconds off the first connection for each visitor.
Health Checks and Automatic Failover
No production deployment is complete without health checks. Nginx uses passive health checking by default — if a backend server fails to respond to a certain number of requests within a time window, Nginx marks it as unavailable and stops sending traffic to it.
Passive Health Checks in Nginx Open Source
The max_fails and fail_timeout parameters on each server directive control passive health checking. Setting max_fails=3 fail_timeout=30s tells Nginx to mark a server as down after three consecutive failures, and to retry it after 30 seconds. This is sufficient for most Node.js deployments.
Implementing a Health Check Endpoint in Node.js
Your Node.js application should expose a dedicated health check endpoint that validates the application is truly healthy — not just that the process is running. A good health check verifies database connectivity, cache availability, and any other critical dependencies.
// health.js — Express health check endpoint
const express = require('express');
const { Pool } = require('pg');

const pool = new Pool({ connectionString: process.env.DATABASE_URL });

app.get('/health', async (req, res) => {
  const checks = { status: 'healthy', uptime: process.uptime() };

  try {
    // Verify database connectivity
    const dbStart = Date.now();
    await pool.query('SELECT 1');
    checks.database = { status: 'connected', latency: Date.now() - dbStart };
  } catch (err) {
    checks.database = { status: 'disconnected', error: err.message };
    checks.status = 'degraded';
  }

  try {
    // Verify Redis connectivity
    const redisStart = Date.now();
    await redisClient.ping();
    checks.redis = { status: 'connected', latency: Date.now() - redisStart };
  } catch (err) {
    checks.redis = { status: 'disconnected', error: err.message };
    checks.status = 'degraded';
  }

  const httpStatus = checks.status === 'healthy' ? 200 : 503;
  res.status(httpStatus).json(checks);
});
Production Hardening and Performance Tuning
Rate Limiting
Rate limiting at the Nginx layer protects your Node.js backend from abuse and accidental traffic spikes. The limit_req module uses a leaky bucket algorithm that smooths traffic bursts while allowing legitimate sustained throughput. Define a shared memory zone for tracking client request rates and apply it to specific locations.
Gzip and Brotli Compression
Enabling compression at the Nginx level reduces response sizes by 60-80 percent for JSON API responses. This is especially impactful for Node.js APIs that return large data payloads. Nginx handles compression far more efficiently than Node.js middleware like compression, because it can leverage optimized C libraries and does not block the event loop.
Connection Tuning
The keepalive directive in your upstream block is one of the most overlooked performance settings. Without it, Nginx opens a new TCP connection to your Node.js instance for every single request. Setting keepalive 64 maintains a pool of persistent connections, eliminating the overhead of TCP handshakes and dramatically reducing latency under high throughput.
Hire Expert Node.js Developers — Ready in 48 Hours
Building the right system is only half the battle — you need the right engineers to build it. HireNodeJS.com specialises exclusively in Node.js talent: every developer is pre-vetted on real-world projects, API design, event-driven architecture, and production deployments.
Unlike generalist platforms, our curated pool means you speak only to engineers who live and breathe Node.js. Most clients have their first developer working within 48 hours of getting in touch. Engagements start as short-term contracts and can convert to full-time hires with zero placement fee.
Conclusion — Ship With Confidence
Nginx and Node.js are a battle-tested combination that powers some of the highest-traffic applications on the internet. By configuring Nginx as your reverse proxy and load balancer, you gain SSL termination, static file serving, rate limiting, health checks, and horizontal scaling — all without changing a single line of application code. Start with the configuration patterns in this guide, benchmark against your specific workload, and iterate from there.
If you are building a production Node.js system and need experienced engineers who understand infrastructure at this level, HireNodeJS connects you with pre-vetted senior developers available within 48 hours — without the recruiter overhead. Whether you need a backend developer to architect your API layer or a DevOps engineer to set up your deployment pipeline, the right talent is just one conversation away.
Frequently Asked Questions
Why should I use Nginx instead of exposing Node.js directly to the internet?
Nginx handles SSL termination, static file serving, rate limiting, and load balancing far more efficiently than Node.js. It acts as a security shield, prevents direct port exposure, and lets Node.js focus purely on application logic.
What is the best Nginx load balancing algorithm for Node.js APIs?
Least connections is the best default choice for most Node.js APIs because it adapts to variable request processing times. Round robin works well when all instances are identical and request times are uniform.
Does adding Nginx as a reverse proxy increase latency?
Nginx adds approximately 1-2 milliseconds of proxy overhead per request. However, the net effect is usually negative latency because Nginx handles SSL, compression, and static files more efficiently than Node.js, and load balancing reduces tail latency significantly.
How many Node.js instances should I run behind Nginx?
A common starting point is one Node.js instance per CPU core. For a 4-core server, run 4 instances on ports 3001-3004 behind an Nginx upstream block. Monitor CPU and memory usage and adjust based on your workload.
Can Nginx handle WebSocket connections with Node.js?
Yes. Set proxy_http_version 1.1, proxy_set_header Upgrade $http_upgrade, and proxy_set_header Connection upgrade in your Nginx location block. This enables the HTTP upgrade mechanism that WebSocket connections require.
How do I set up SSL with Nginx and Node.js in production?
Use Let's Encrypt with Certbot for free automated certificates. Configure SSL termination in Nginx so that traffic between Nginx and Node.js stays on localhost over plain HTTP, avoiding the overhead of encrypting internal traffic.
Vivek Singh is the founder of Witarist and HireNodeJS.com — a platform connecting companies with pre-vetted Node.js developers. With years of experience scaling engineering teams, Vivek shares insights on hiring, tech talent, and building with Node.js.
Need a DevOps-Savvy Node.js Engineer?
HireNodeJS connects you with pre-vetted senior Node.js engineers who understand production infrastructure — Nginx, Docker, Kubernetes, and CI/CD. Get your first developer within 48 hours, no recruiter fees.